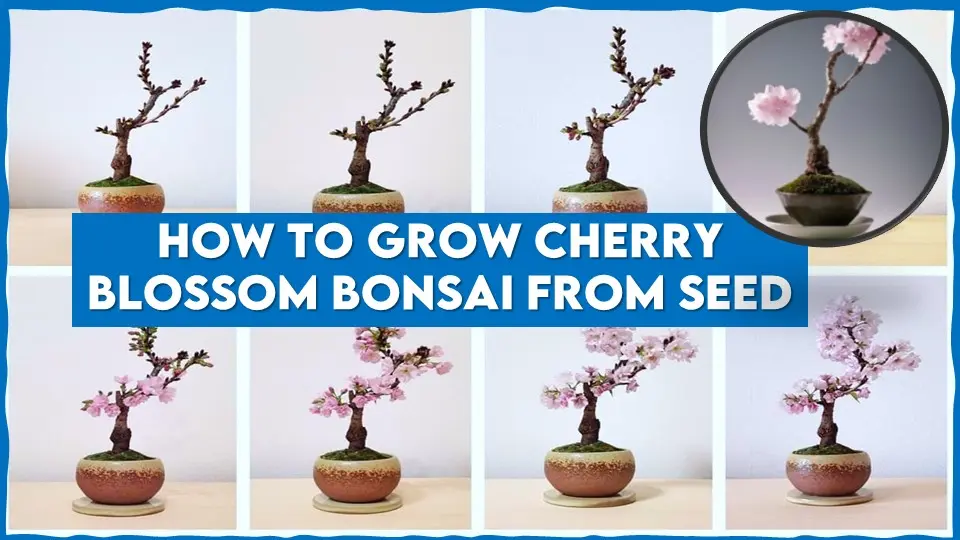
How to Grow Cherry Blossom Bonsai From Seed: Improved Methods and Care.
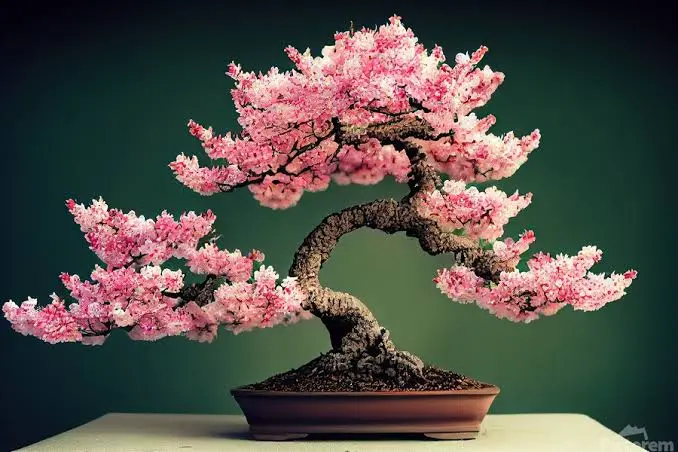
Cherry Blossoms are the symbol of impermanence, which signifies the ephemeral nature of life. Yet, the beauty of Spring is incomplete without these trees around. The swirling pink blooms of the tree are a visual therapy that stays in nature for a few days but leaves us with an ever-longing feeling. Having such a tree in a corner of your house that may not take much of your space but gives you equal benefits, is such a blessing.
Just use the basic principle of choosing the plant based on hardiness. The most common way of developing these bonsai is from Seeds, So let us know how to grow cherry blossom Bonsai from seed and why it is popular.
Cherry Blossom is the National tree of Japan, where it is called as ‘Sakura’, the same country that also popularised the art of Bonsai. You may see people enjoying their holidays or weekends under blooming cherry blossoms during March or April with sake on the side, they call it ‘Hanami’. It is more like a tradition in Japan, In fact, their curiosity and likeliness of cherry blossoms, made them develop hundreds of such cultivars. Two such cultivars are the Yoshino cherries in Asian countries and Kanzan in Western countries.
You will find these magnificent trees all around the East-Asian countries, as it thrives best in temperate regions. There are hundreds of cherry blossom species around the world, some of these may also bear fruits, and some are just as small as the bushes, but it is mostly cultivated for ornamental purposes, and hence, flowering cultivars of Prunus serrulata are more popular. And for bonsai, you may select Prunus serrulata, Prunus kurilensis, Prunus subhirtella, or Prunus incisa. The fruit species like Prunus avium or Prunus cerasus, can also be used.
Also Read
| Common Name | Cherry Blossoms, Japanese cherry or Sakura |
| Scientific Name | Prunus sp. |
| Family | Rosaceae |
| Hardiness Zone | 5-8 |
| Plant Height | 15-30 feets |
| Blooming Time | Spring |
| Flower | Pink, White, Yellow Green, sometimes depending upon the age of the plant. |
How to Grow Cherry Blossom Bonsai From Seed
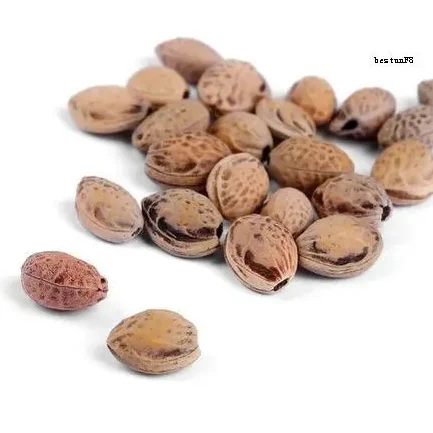
Selection of Plant and Seed
The purpose of making a cherry blossom bonsai is solely ornamental. Choose a hardy cultivar with good ornamental properties, although it is best to take a seed from a local nursery or trees growing in your area. The seeds of Sakura take around two to eight weeks if not treated first and left on their own for germination. For better moisture absorption and germination follow the process of scarification and stratification. Make sure the seeds used are free of diseases and pests.
Methods of Scarification
Mechanical Method
The Mechanical Method includes rubbing seeds with sandpaper or scraping them with a knife. In the worst cases, one can also use a hammer to do the same. Do not damage the embryo inside the seed with these rigorous methods.
Chemical Method
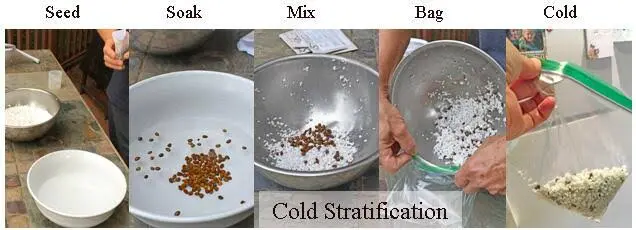
- Treat or dip the seeds in 10% hydrogen peroxide for at least ten minutes. Remove the seeds, wash them with water and sow. Keep the seeds moist in a plastic bag and put them in a refrigerator with your vegetables. Observe the sprouts whenever they will come out.
- Another popular chemical treatment is by immersing the seeds in concentrated sulphuric acid for 2-5 minutes. Or give a hot water treatment at 90°C for 5-10 minutes.
- Even after the treatment, the Cherry Blossom may not germinate quickly, it may take a few weeks to months for germination, as germination is a genetic factor as well. So be patient with the process.

Prepare the Plant
After stratification or scarification, put the two centimetres deep in a normal pot with a soil mixture containing thirty per cent sand, and forty per cent topsoil and fill the left part with compost. Sakura thrives best in acidic soil, hence compost is a better option than synthetic fertilisers. One can also give fungicide treatment to prevent moulding around the sprouts and seedlings. Place the pot in a warm place where it can get maximum hours of sunlight.
The pot used for this purpose should have good drainage, it is better to use a ceramic pot for good aeration inside the pot. Grow the seedling until it reaches a four-inch height with several branches, this may take two to four years. In any case, don’t transplant the plant for bonsai making until it meets these conditions.
Make a Plan and Design
Here comes the artistic part, where your imagination will shape the plant. First, determine the style of your bonsai, it could be straight or chokan, winding or kyokkuk, oblique or sakkan, Cascade or Hakkan, Ikadi Buki and may be a clasped stone type. The pots used for any of these styles must go in harmony.
To locate and train the plant accordingly, Make sure that the canopy of branches starts from at least one-third height of the plant. Prune the plant in such a way that it must look like a tree and not like a bush. Observe the thickness of each branch, keep the branches that you need for styling and remove any unwanted thick branches.
Transplanting
Transplant the plant in the shallow container you chose for bonsai, only after the plant is ready. Prune the stems and roots. Use a ceramic bonsai plant with two drainage holes at the bottom that could also be used for wire training. Transplanting must be done carefully, and don’t harm the branches in the process.
Fill the container with the right soil mixture and compost containing one part of topsoil, two parts of leaf mould, etc. Right after transplanting, place the container in the shade for an initial one to two weeks.
Pruning and Pinching
Pruning and Pinching is not a one-time process, it needs to be done throughout its life. The plant remains dwarf in bonsai because of the rigorous pruning and the feed. Various pruning methods like leaf pinching, shoot pruning and root pruning. Always remember to prune only during the growing season.
Leaf pinching is necessary for the continuous growth of only small leaves on bonsai, which gives a proportionate effect. On the other hand, shoot pruning or pinching is done to shape the bonsai. And Root pruning is not supposed to be as frequent as the other two. It is only done at the time of repotting when all the side roots and dead roots are removed for slow absorption of nutrients. Plus, it is the reason why it fits in those shallow containers.
Cover the pruned parts with Chaubatia paste, Mancozeb or any other fungicides to prevent any diseases.
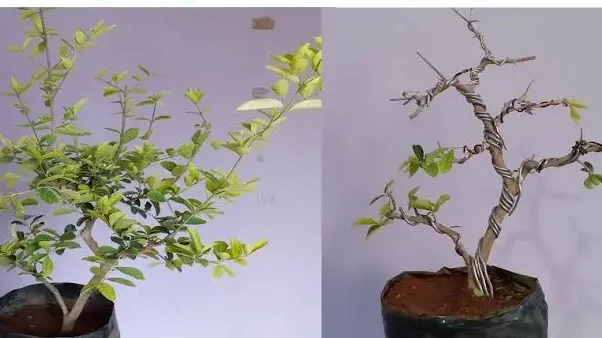
Wiring
The wire threaded with the pot before transplanting helps in the stable positioning of the bonsai plant. The same wire could also be used to train the whole shape of the bonsai. If the wire is short, add another wire in continuation of that wire. It is necessary to bend the wire along the plant at 45°.
Rewiring must be done when plants start growing further and the wire starts scaring the trunk or any branches. If the wire is too tight, then it will lead to unwanted twisting and abnormal growth. So avoid such practice. A copper wire is best for this purpose.Water the plant accordingly and provide it with enough sunlight.
Repotting
Frequent repotting is not a wise practice in Bonsai, it can also cause shock in plants, or damage to the plant parts or roots. Usually, the repotting in bonsai is done after 3-4 years, only when the pot becomes completely root-bound or when the plant gets infested with diseases.
- Firstly, depotting is done. Water the pot and leave for a few hours, then remove the plant along with the root ball.
- Carefully observe the root ball and whole root system, remove infected and dead roots, and treat them with fungicides.
- Again, prepare the same soil mixture as prepared during the first potting.
- Take a two-inch bigger pot than the previous pot if repotting is being done for pot-bound bonsai.
- Carefully wash and sterilise everything that is being used for this operation.
- Place the bonsai in a pot and water it properly.
- Keep observing the drainage and place it in a shady place for the first few days.
How to Care for Cherry Blossom Bonsai
Good Placement
Cherry blossoms are winter hardy and need at least three months of winter dormancy, but small plants and bonsai must be protected from extreme chilling. During winter, place the bonsai in the southward direction. It is wiser to plant them in partial shade during extremely hot summers. Otherwise, the plant may wilt down.
Feed Enough Water
Provide rainwater or water from natural sources rather than tap water. Cherry blossoms need a lot of water to grow and its roots shouldn’t be left dry for too long. But, waterlogged conditions can harm the plants even more. It can cause rotting and invites many soil-borne diseases around the root ball.
Monitor Nutrient Application
It is best to use organic fertiliser or manure for extra nutrient supply. Apply a liquid fertiliser once a month in case you need more growth. Avoid the application of high nitrogenous fertiliser as it promotes excessive shoot growth and diseases, just never overdo it.
Control Pests and Diseases
Bonsai are not sensitive to many pests and diseases. You may find Aphids and jassids around the bonsai. In extreme cases use Malathion @ 0.2% or just apply more water. Avoid frequent watering if signs of yellowing and mildew occur. It may be due to soil-borne pathogens or overwatering. If the condition of the plant still deteriorates, go for repotting and apply a mixture of fungicides in the soil and pruned roots. Hot water treatment may also be effective.
Conclusion
The soft pink petals of cherry blossoms can bloom on each face in the house. To carry such a piece of nature in a miniature is not an easy task. But with continuous observations and proper care, it can be nurtured properly and add to your aesthetics. Growing a bonsai from seed may seem like a long process which will take away a lot of your time but is the best practice to shape and train the plant. In this guide of How to grow cherry blossom bonsai from seeds. Use this bonsai for decoration and pass it on for generations. Let the bloom rest in winter and bear flowers during summer.
Latest Post
- How to take care of Lavender Plants Indoors effectively

- 15 Types of Houseplants With Big Leaves
- Best 20 Types of Fuzzy Succulent Plants
- 15 Types of Ice Plants to Transform Your Garden into a Vibrant Oasis
- Top 20 Types of Begonia Plants to Cheer You up Everyday
- How to Care for Dawn Redwood Bonsai: Convert a Giant into Miniature.
- Top 15 Types of Monstera Plants You Should Know About.
- How to Care for Pearls and Jade Pothos
- How to Grow Cherry Blossom Bonsai From Seed: Improved Methods and Care.